Product Review Article ...

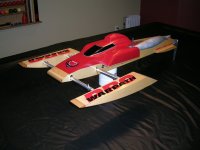
The new Stryker Y6 Racing Mono from RC Boatworks...a solid contender!
Sometime during the winter I decided I was going to retire my current racing mono and start looking around for a new one. I didn't really know exactly what I wanted, but I knew one thing for sure, I wanted a solidly built boat, a fast runner of course and I wanted it to be an open type mono without a cowl. I have had several great monohulls with cowls and now I wanted to try something different. The New Stryker Y-6 mono seemed like a good choice. I ordered my boat and received it within a few weeks.


I was very impressed with the build quality of the boat. The finish was perfect and the lay-up fairly thick. I could tell right away this was a solid hull. Its sleek lines also had me convinced it would be a fast one!
The Stryker mono in this review is a polyester fiberglass construction. RC Boatworks also make the boat in Carbon Fiber on special request. The boat is assembled in a "seamless" fashion which also looks great. It features marine grade 1/4" plywood stringers and transom. The gelcoat finish is available in several different colors from RC Boatworks. The hull is approximately 46" long and 13" wide.
The boat also came with a matching fiberglass radio box with cover and a gas tank tray. (extra cost)
Assembly
Since I did not receive any real assembly instructions with this hull I decided to use some hardware I had on hand and ordered whatever was missing. (In the end it all worked out great as you will see in the video below!) I did however have some pictures of Y6 setups that Vince Amore of GasRC Products had sent me, which I used as reference.
Here is a listing of the transom hardware I used for this build:
- Topsecret Boats Drive
- Speed Master trim tabs and tuned pipe mount
- Herzog Racing Products turn fin
- Insane Boats extended rudder (5.5 inches)


 I started by masking off the transom with tape and marked the hull centerline and a line from chine to chine. The centerline is drawn perpendicular to the "chine to chine" line and so is the rudder centerline. The latter is located 2.5" to the right of the hull centerline. I then marked the hull centerline at 1/2" above the bottom of the hull. This is where I drilled my hole for the stuffing tube.
I drilled the transom the same size as the stuffing tube and assembled the drive. With the stuffing tube installed in the drive, I pushed the tube through the transom until the drive was in position. I then drilled the mounting holes for the drive and mounted it to the transom. I then removed the drive body from the brackets (leaving the brackets attached to the transom) and slotted the stuffing tube hole in the transom to allow for drive adjustments later. The final drive adjustment was done as follows: with a straight edge along the keel of the boat, I extended it to where the drive cartridge enters the drive body. I lowered the drive so that the back of the body (not the cartridge) was about 1/16" above the straight edge.


 For the rudder I installed it so the blade's centerline was right on the rudder line I did on the transom. The bottom edge of the blade extends to 3" below the keel of the boat and its leading edge is at 5.5" from the transom. This puts the leading edge of the rudder just about even with the trailing edge of the prop. I mounted the rudder bracket and also drilled the hole for the control linkage. The rudder blade is set perpendicular to the hull's bottom.

 I mounted the trim tabs 1/16" above the bottom of the hull and at 2 1/4" from the hull centerline, measured along the hull's bottom (see pictures). The left (port side) tab is set at 0 degrees (parallel to hull bottom) and the right one so that its trailing edge is just about even with the bottom of the boat (check with a straight edge).
The turn fin was mounted so that it is right on the hull's chine edge. It is perpendicular to the hull's bottom. Check with a square.


 I used Hypertorque drop mounts for the engine. The measurement from the transom (outside) to the spark plug is 14". (With the boat completed the C.G. was at 15.25" or 33% with no gas). I mounted the engine as low as possible in the hull using a piece of 1/16" plywood as a shim under the engine when marking the rails for the mounts. I used a 100 degree header aluminum pipe and it should be noted that this barely fits in the hull. It is very tight if you try to tilt the pipe up, for example to access the radio box for maintenance. The pipe must lie as low as possible to sufficiently clear the edge of the cockpit. This could of course be solved by trimming the deck opening a little bit, but I didn't want to do that unless absolutely necessary and just wanted to point out that it can be done without trimming. Just make sure to mount the engine and pipe as low as possible. After racing this boat several times, I recommend mounting 1/2" more forward than noted above, or adding about 8oz of weight under the pullstart for optimum heat racing reliability.


At the motor end the stuffing tube is held in place using a T-Bar that I modified to use a set screw to firmly hold the tube. I also used machined aluminum washers from Aeromarine Laminates for the T-Bar screws in the rails.
*for the record, the gap between the stuffing tube and the engine collet in the pictures was too big...the stuffing tube was replaced with a longer one after the first one got bent out of shape after a few runs...that's what happens when you try to chance it and use a piece you have laying around!!! :)


I epoxied (and sealed) two pieces of 1/4"x1/4" square spruce to either sides of the radio box and drilled them to accept 4 
 brass screws. These screws are used to secure the radio box to the rails. Behind the box (transom side) I epoxied two stopper blocks to the rails so that the box simply needs to be fitted between the rails, butted up against the stopper blocks and the brass screws installed. Installation and removal is very simple and no holes are drilled in the box.
To mount the servos, I epoxied a sealed piece of 1/4" thick oak to the bottom of the box. I machined the servo mounts myself out of aluminum angle stock and they are held in the box with stainless steel wood screws. Again, no holes through the box itself. The antenna is mounted in the cover of the box. In the end, the only holes drilled in the box are for the linkage and the radio switch.
The servo for steering is a high torque digital servo (standard size) and the throttle servo is a standard one. I installed a servo "Y" Harness for the steering servo.


For both the throttle and rudder linkages I used 4-40 threaded rod and heavy duty clevises. The rods are both in two pieces and secured together using a small wheel collar with set screw. This makes for very easy rough linkage adjustments and above all very easy radio box removal/installation.
As with a lot of my builds I used a gas bag rather than a hard tank. The bag is held in place with a small hook mounted to a piece of wood epoxied between the rails at the front of the boat. These little hooks are sold at hardware stores as "cup hooks". They have a safety clip that will prevent the bag from coming out. I used a "Tee" in the fuel line for refilling the bag.


That pretty much covers this build. Pool noodles were installed for floatation and some vinyl decals were added to finish it up.


At the lake:
As you will see in the video the boat ran very well. Some of the video footage is actually from the very first run with the adjustments as mentioned above. I tried a few different props and in the end the two best were a modified 472/2 from The Propworks and a XXX Tater from Voodoo Props. Both performed very well. The first half (approx.) of the video is with the 472 and the part of the video where you can see buoys in the water is with the Voodoo Tater prop.


The motor used was a full mod Zenoah 260 from CC Racing Engines. The pipe was a Hanson 2" band aluminum pipe on a 100 degree header with a Cooper stinger muffler.


I have run the boat several times in varying conditions and I am very pleased with the overall performance. It is fast and carves the turns well without scrubbing too much speed. It features a high front edge around the engine bay opening to keep water out of the boat and more importantly, away from the carburetor. Although I did not have any problems while racing at the lake with a friend, I will most likely install a carb shield just to be on the safe side for serious heat racing.
VIDEO OF THE Y-6 IN ACTION!
Final Impressions
The only negative I can think of is the lack of detailed setup instructions from the manufacturer. I hope to see a setup sheet made available to future customers from RC Boatworks!
This is yet another great racing mono! Solid construction, great handling, and fast. It is produced by RC Boatworks, maker of the ever popular Stryker Cats and Hydros. They have a great track record in the racing world and this new Stryker Y6 mono will be no exception!
Pricing information: from GasRCProduct
Stryker Y6 Mono: $298.00 USD plus shipping (at time of this writing), shipping extra.
Contact Information:
GasRCProducts
Vince Amore
Website
This email address is being protected from spambots. You need JavaScript enabled to view it.
RC Boatworks
Rigoberto Bustanante
2701 Orange St.
Unit P
Santa Ana, CA 92707
Office #:714-641-5871
Website
This email address is being protected from spambots. You need JavaScript enabled to view it.