Scratch/Custom Builds Article ...by Michel Jutras

A step-by-step guide at building a wooden Crackerbox hull!
List of needed materials:
|
|||||||||||||||||||||||||||||||||||||||||||||||||||||||
Safety Precautions
Please make safety your number one priority when working with power tools and chemicals. Paints and thinners can be harmful and hazardous when not handled properly. Refer to the product labels for instructions on how to use and dispose of these products as well as the recommended safety precautions. Also remember to wear proper Eye, Hand, Ear and respiratory protection as required. Be sure to work in an adequately ventilated area whenever you work with glues, thinners, and chemicals!
That being said, lets move on with building your very own Crackerbox Hull!
Building board:
- A flat, rigid building board is required. A hollow core door, or similar flat building surface can be used. Bulkheads may be temporarily glued to the surface to keep the hull construction perfectly square and straight.
- Mark a center line down the building board.
- Align the top plan view to the building board using your center line as a guide.
- Transfer the bulkhead locations to the building board.
Here are the basic steps for this project:
1- Find, or make a Plan. Many different plans are available from mail-order sources and some are also available on the internet. The boat in this project is based on plans found on Powerpete's Website, but many modifications were done to the original plans, and many of the next steps reflect these changes.
2- Verify symmetry of parts (bulkheads). Make changes if necessary. In this case I had redrawn the entire plans in AutoCad (3D), thus making it easy to correct any errors. The easiest method is to fold the bulkhead templates in half, cut-out one half and unfold. This will yield a perfectly symmetrical pattern!
3- Resize plans to proper size for creating full size templates. Once again having it in AutoCad made this an easy task. If you don't have the luxury of having plans on Cad, you can also resize them using a photocopier. Most photo copy centers can do this for you. In this case the boat is 48 in. x 16-1/2 in.
4- Decide what stringer spacing you will require (some redrawing of the plans will be necessary if you change spacing). I used standard 5 in. spacing for this project, but since I used a Homelite Leaf Blower motor, 6 in. spacing would have been preferable, and would have allowed for easier alignment of the motor with the stuffing tube.
5- I printed the plans on 8-1/2 x 14 in. paper, so some joining was necessary. If you trim the printed plans, leave enough material (paper) around for gluing.
6- Now glue printed paper plans onto the 1/8 in. plywood. Glue around the part, in a way that glue and paper residue will stay on the scrap pieces, not on the parts you will be using to build the boat.
Alternatively, you can use a low-tack glue, like a glue-stick or low-tack spray adhesive to secure the plans to the wood. This will allow the plans to be removed from the good parts without leaving residue.
7- Use a scroll saw or jigsaw to cut out the parts.

8- I pre-cut the pieces of the keel where the skeg and the stuffing tube would go through. This can also be done later, but if you already know placement of these items, it's easier to pre-cut the pieces.

9- Cut the stringers out of 1/4" marine plywood.

10- Assemble everything on the plan WITHOUT glue and verify that everything fits ok. Trim and sand if necessary.

11- Laminate the keel pieces together.


12- Glue bulkheads 1 through 6, the keel and the top braces together. I glued everything with Epoxy. Set aside bulkhead 7 for later, when the 1/4 x 1/4 in. spruce pieces will be installed.
Note: Take extra precaution here to verify that everything stays straight and square. Twisted framing will make sheeting the bottom and sides more difficult later!
13- Adjust the 1/4 x 3/8 in. pieces for the bottom stringers. For my next boat I will be using 1/4 x 1/4 pieces instead. Always double check that everything is lined up as you go.
14- Glue the 1/4 x 3/8 bottom stringers.

15- Adjust the 1/4 x 3/8 braces and other pieces for the deck.
16- Glue the 1/4 x 3/8 deck pieces.

17- Adjust the 1/4 x 1/4 in chine and shear pieces at the bow of the boat to get the fit you want.
18- Glue the 1/4 x 1/4 in pieces. I used tie wraps to hold the pieces in place while gluing.

19- Cut off pieces extending past bulkhead 6 and glue bulkhead 7 in place.
20- Glue in stringers.
21- Sand bulkheads and keel for proper fit/finish.

22- Prepare bottom sheeting. Plywood has two sides; be sure the better side is facing out. Use sheets a little bigger than needed. Line up your piece with the center of the boat and draw the keel line onto your piece. Cut your piece, making sure you leave a small overhang at the chine. Make both bottom pieces.
Note: If you prefer to "measure twice, cut once", try placing heavy tag or banner paper down the length of the hull and mark for a hull bottom template. Trim out the template, and transfer the pattern to the plywood.
23- Before
you start gluing, try getting everything to fit as seamlessly as possible. Glue
bottom  sheeting one side at a time
making sure everything fits ok. Have some heavy objects and many clamps on hand
before you start this step. Use the clamps (or wash pins) to hold the sheeting
to the side stringer forming the chine. The bottom sheeting is a very important
step and should be done very carefully, as the good job you do here will most
likely be reflected in the performance of your boat. Use plenty of epoxy, making
sure the sheeting bonds well to the framing.
sheeting one side at a time
making sure everything fits ok. Have some heavy objects and many clamps on hand
before you start this step. Use the clamps (or wash pins) to hold the sheeting
to the side stringer forming the chine. The bottom sheeting is a very important
step and should be done very carefully, as the good job you do here will most
likely be reflected in the performance of your boat. Use plenty of epoxy, making
sure the sheeting bonds well to the framing.
24- If not already done, now is the time to make a solid boat stand.

25- Cut, test fit and adjust the sides, similar to the way you did the bottom sheeting.
26- Glue the sides, using clamps and pins as required.

27- Cut off the tabs on bulkheads and sand flush.
28- Waterproof the inside of the hull using epoxy.
29- You may want to add floatation in the 3 front compartments at this time. Floatation type is a matter of personal preference. Many things can be used, such as soda bottles, inflatable balls, closed cell foam, etc.
30- If you decide you will be using a tuned pipe system with your motor, you might want to keep it below deck for scale appearance. Consider using a wet pipe as it will be shorter and cooler than a dry pipe system. Make sure it will clear the radio box.
30- Cut, test fit and adjust the deck sheeting, similar to the bottom and sides. Waterproof the underside of the deck sheeting.
31- Glue the top sheeting in place. Once again, overlap at the sides is preferable...sand this flush later.
32- Install the stuffing tube. Glass or epoxy in place. Consider using a brass tube one size bigger than the actual stuffing tube for the through-hull section. This will allow for easy replacement of the stuffing tube in the future.
33- Take everything out and epoxy coat the complete inside of your boat.
34- If you wish, you may use fiberglass cloth to reinforce and protect the bottom of the hull. Make sure the bottom is as you want it before glassing it (straight and free of hooks).
35- You can make a radio box out of wood if you wish...make sure to seal the wood with epoxy. For this project I used a Tupperware style container for the receiver, batteries and throttle servo. The rudder servo was mounted on an aluminum bracket fixed to the transom with the rudder's supports.


36- Now its time to install all the hardware, radio box and linkages. For this project I used Speedmaster hardware.
37- With everything installed in the boat, including fuel cell (most fill it half full for this step), you can now determine component placement for proper center of gravity (C.G.) The motor being by far the heaviest component, try to have it right at 30%. Later you may experiment moving C.G. fore and aft by moving the fuel cell and/or radio box.
38- If you're going to paint the hull, remove all the hardware and reinstall after paint has cured. This will minimize the chances of messing up a great paint job with drilling for hardware and components.
39- If you are going for a "natural" wood finish, sand the entire hull with 400 grit paper and a sanding block, blow off sanding debris with light air pressure and use a good tack cloth to clean the hull. Apply several coats of Spar varnish, polyurethane, or similar. Sand with 1200 grit paper, clean and de-tack between coats.
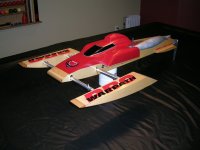
40- Once everything has been reinstalled, double check it all for tightness and proper adjustment and head to the lake!
*** Important Note: The cockpit and drivers were not mentioned since these parts were not completed at the time I wrote this, but keep in mind that they, also, will affect the C.G. of the boat.