Product Review Article ...

Our review of Seaducer Boat's Gas Sport Hydro...
Download the Seaducer Hydro Manual here!
This is yet another fine product from Seaducer Boats who are based out of Ft. Lauderdale Florida and owned Jerry Crowther.
 The hull is a shoebox design (which means that the top half overlaps the bottom half when the two are joined. It is made of carbon fiber, with the exception of the cowl and engine bay compartment, which are made of fiberglass. Each one is serial numbered by Seaducer Boats for proof of authenticity. The hull is 45 inches long and 21 inches wide. It has many innovative design features including a gelcoat finished engine bay, a built-in radio box, a preformed stuffing tube exit and pre-installed floatation and engine mount brackets. Seaducer Boats will even pre-install the turn fin bracket for you, a very important step of building for a hydro to perform well. These features make this boat very easy to assemble. You can have it race-ready in no time!
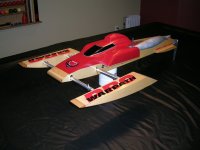
Here are some pictures of the hydro as received from Seaducer Boats. The packaging was surprisingly compact, yet everything was well protected and arrived in perfect condition. Jerry uses a clingy plastic wrap on the hull itself to protect it. There is also plenty of protective material in the box.


Assembly
It is strongly recommended that you purchase the hardware kit and motor mounts from Seaducer boats to make your build easier and successful.
Below are some pictures of the assembly of the boat.
I started by installing the gas bag and fuel lines including a gas filter. The gas bag used is from American RC. You can read more on their gas bag setups HERE. The hull comes with two small hooks in the nose section for securing a gas tank...another nice feature. I removed them and used one of them in the very front of the nose section to hold the gas bag instead.
Getting the motor in the boat is a breeze. Install the motor mounts on the engine and then drop the engine into place on the pre-installed brackets and secure it with the included stainless steel screws and washers. This is a major time saver and there is no guessing. The engine is where is it supposed to be and at the correct angle to line up with the stuffing tube.
You will also have to purchase or make a throttle linkage setup as it is not included with the motor mount kit. You can see how I did mine in the picture below.


I cut out the air scoops in the cowl and the rear cut-outs for the tuned pipe and hot air exits. With the piece that I cut out for the tuned pipe exit, I made a deflector in the main front scoop to help direct any water that might come in away from the carburetor side of the engine. This was done as a precaution only.


I then proceeded to tape up the transom and mark the centerline where I then drilled for and mounted the strut. The transom of this hull is on an angle and thus you will want to use the hardware kit from Seaducer Boats which is made to accommodate for this slanted transom. Mount the strut bracket so it is flush against the lip of the deck. Also make sure it is square with the bottom of the hull. I then marked the transom for the rudder bracket and installed it also. The rudder bracket is installed so the rudder centerline is at 2 inches from the strut centerline. The bracket is notched to fit partially over the deck lip. I also made sure it was square with the strut bracket, which is also square with the bottom of the hull. Double check this. The included instruction sheets explain all the hardware installation very thoroughly.


The instructions call for shortening the rudder blade. To do this you mark a line on the rudder even with the bottom of the boat. You then make another mark 3 3/4" down from the first one and cut the rudder blade off at this point.


To install the stuffing tube, insert a piece of 1/4" rod or similar (I use a 1/4" drill bit) into the engine's collet. If your engine doesn't yet have a collet installed, now is the time to do it! With the 1/4" rod in the collet and the engine mounted it's easy to get the stuffing tube installed and lined up correctly with the engine. I used a 4" long piece of 11/32" brass tubing as a sleeve for the 5/16" stuffing tube where it goes through the hull. I drilled the preformed stuffing tube exit in the bottom of the hull to 11/32". The 11/32" sleeve fits over the 5/16" stuffing tube and is the part that will be epoxied into the hull. You will want to roughen up the outside of the sleeve with coarse sandpaper or similar for the epoxy to properly stick to it. Run the stuffing tube from the strut to the engine bending it accordingly. Try to get it straight from the engine to where it exits the hull, and then slightly bend to get it straight to the strut. Make sure the sleeve is in proper position; i.e. partly inside the hull and partly outside. Clean the stuffing tube cavity in the hull with acetone. Mix up some epoxy and fill the stuffing tube cavity with it. Once cured, this will hold the stuffing tube securely into place. I also like to solder the sleeve to the stuffing tube to prevent movement. If replacement of the stuffing tube is required in the future, a little bit of heat will let it come lose and the tube can be removed, leaving the 11/32" sleeve in place in the hull.


I used a 2" band aluminum pipe with a 1" diameter header in my hydro. To get this pipe to fit in the boat I had to trim away some material from the engine bay lip at the top. Since this was at the back end of the engine bay, I was not too concerned about doing this. Had it been in the front I would have opted for a different solution because this lip actually prevents water from coming into the engine bay when racing. Another nice feature of this boat is how the deck has a preformed recess in it for the tuned pipe to sit lower in the hull. Were it not for this, this particular tuned pipe would have been impossible to get in there without cutting up the cowl. The tuned pipe support (included in the hardware kit) is mounted to the top deck in an area that is reinforced with wood from the inside. Note: you will need a 106 degree header for your tuned pipe to exit the cowl at the correct angle without cutting the cowl.


The turn fin installation is quite simple. Mount the fin to the pre-installed bracket using the two supplied screws. Lifting up the back of the fin will pull down the front of the boat more. Typically you will want to raise the back end about 1/8" above level with bracket. Fine tune on water according to conditions. I learned this the hard way. I flipped the boat once...only once folks, no lies...and it was during a heat at the 07 Gas Nationals. It was a hard one to take in! Jerry had told me...it was entirely my fault for not listening. * as it is pictured here, it's level...the back end has to come up.

The radio box setup is pretty straight forward, with the exception that you will want to install the linkage seals on the inside of the box due to limited access to the outside of the box. This is because of the fact that the box is integrated to the deck itself. There is a piece of 1/4" plywood pre-installed under the radio box which is a nice feature. It allows you to screw the servo brackets right in without loosing vertical space in the box itself. Just make sure that you do not use screws longer than 1/4" to avoid going through the bottom of the hull!

There is enough room to use a 1/4 scale servo for the rudder. If you want the rudder linkage to line up perfectly with the servo arm on the rudder you will need to use a large scale ball link mounted to the underside of the rudder arm. I did not have any so I got away with it due to the fact that I use 2-part linkages joined with a collar. I also glued in a "gusset" to prevent flex in the rudder linkage. I mounted the included antenna in the radio box lid and used a small Oring to ensure a water-tight seal. The lid is held down and sealed with radio box tape. Here are some pictures of the radio box install.


The nose of the hull is made to accept the cowl and thus no front hold-downs are required for the cowl. The back of the cowl is held with Orings. There are pieces of wood under the deck where the Oring supports are to be screwed in. The deck also features two pre-formed "stubs" over which the cowl sits preventing side to side movement. Do NOT forget to add floatation to the cowl!


The water line from the rudder to the engine is routed in the starboard side of the hull as per the instructions. The water exit fitting can be installed in the nose section of the hull next to the windshield. You will also want to drill one or more drain holes in the transom to drain any water out of the hull after running. The hull is supplied with a rear hatch cover that is held on with simple radio box tape. I replaced this cover with one I made of see through Lexan just so I could keep an eye on my rudder linkage without having to remove the cover. This was just a matter of preference.


I also later made a 1.5" x 1" opening in the cowl just behind the carburetor for additional air to the engine. Again, personal preference.
Pre-run setup
I set the boat up as per the instruction sheets. Set the strut to the proper depth and level with the boat setup on a flat surface. I started with the turn fin level with the bracket (incorrect as mentioned before). I eventually ended up with the turn fin's back end about 1/8" up from level.
At the Lake
I must admit that my first times out with the Seaducer Hydro were less than perfect. It took me a while to figure out the setup, and in the end it all boiled down to the propeller used. I cannot stress this enough...if you want this boat to perform well, get the right prop! I tried just about every prop I had in my box, and nothing worked well. I spent an entire weekend at the races trying to figure it out, until I finally got one of Jerry's props (thanks to Kevin Sheren who finally let me buy his - Jerry was out of them at the time). The boat was instantly reborn! The performance was nothing short of excellent. Fast, stable and cornered great! I also got a prop from Bob Austin at the Propworks that performed excellent also.
Here are some stills and action shots...


Things I didn't like...
- no throttle linkage included in kit
- motor mounts do not allow for starboard side starter mounting (personal preference only)
Things I liked...the list is long, there are many to list!
- excellent glass work
- sturdy construction - Carbon fiber main hull
- enclosed engine bay, easy to clean - all gel coat finish
- pre-installed floatation (except for cowl)
- front cowl hold down not required
- pre-installed motor mount brackets (with extra set of isolators included in kit)
- integrated radio box
- stuffing tube exit pre-formed in hull bottom
- high quality motor mounts including built-in coil relocating bracket
- high quality hardware kit includes pipe mount and antenna
- pre-installed turn fin bracket
- high quality turn fin, made of thick aluminum, pre-shaped and pre-sharpened
- pre-installed hooks for gas tank hold-down
- plywood backing in radio box and strategic areas
- pre-formed rear cowl stops in the deck
- pre-formed recess in deck for lower tuned pipe mounting
- awesome performance!
Final thoughts...
The Seaducer sport hydro is by far the easiest sport hydro I have ever had to build. Seaducer Boats have done all the most difficult parts of the setup for you when you receive the kit. The high quality hardware kit is a must for this boat in my opinion. The quality of the hull is excellent. It is extremely sturdy due in part to the fact that it is mostly constructed of carbon fiber.
The most important piece of advice that I can give to anyone buying this boat is to also order the correct prop to go with it, otherwise you will probably not be happy with the performance. Get the right prop and you will love it! This is a true race boat and a great one at that!
Happy Boating!
* I would like to thank Chris Rupley for his pointers. I would also like to thank Jerry Crowther for taking the time to answer my many inquiries.
Contact Information:
Seaducer Boats
Jerry Crowther
2071 NE 55 Ct
Ft. Lauderdale, Fl 33308Phone (954) 493 7387Fax (954) 772 9002
Website: www.seaducerboats.comEmail: This email address is being protected from spambots. You need JavaScript enabled to view it.
")