
Product Review Article...

Our review of the Aeromarine Thunderbolt sport hydro!
The Thunderbolt is another great boat from world renowned R/C boat manufacturer Aeromarine Laminates. With its sleek lines and aerodynamic design, this is probably the fastest competition hull in the Aeromarine line-up. It is a 3-point hydro legal for competition in the sport hydro classes in both IMPBA and NAMBA.
The hull is hand-laid of polyester-fiberglass. The seam is what is called a shoebox, which means the top deck fits over the bottom of the hull with a slight overhang. It features a glossy gelcoat finish available in different colors.
As with all Aeromarine hulls, the Thunderbolt has a serial number laminated to the inside bottom of the hull and it is also delivered with a paper certificate of authenticity with matching serial number. This is something you will want to look for if you purchase the hull second hand or from a retailer other the Aeromarine Laminates directly. Beware of imitations, they are out there!


The kit I received from Aeromarine was the hull and hardware combo. It features just about everything you need to build the boat with the exception of the radio gear, engine, collet, mounts and exhaust. It did not however come with setup instructions. I will do my best to detail all the important steps of the build so that you can use this article as a setup guide for your Thunderbolt.
The build...
In order for the rudder brackets to fit properly I had to trim away part of the deck overhang at the seam (see pictures below). The rudder was mounted with its centerline at 2 5/8" to the right of the hull centerline.


With the strut and rudder mounted I moved on to installing the gas bag and fuel lines in the boat. The gas bag used is a 1000ml bag from American RC . It was ordered complete with fuel line, "T" fitting for refuelling and a fuel dot for plugging the fill line. These are very nice setups. For the record, a 500ml bag would also do fine. The 1000ml bag is a little bit on the "big" side for a sport hydro and must be fitted half under the engine.
You will also notice that I trimmed the starboard (right) side engine rail slightly...this is for clearance of the motor's carburetor.


I used a dummy engine to locate and drill for the motor mounts. The actual engine used in the testing of the boat is a CC Racing Engines Pro Mod Zenoah 260 with CC engine mounts.
A good trick for marking and drilling for these mounts is to install the rubber isolators on the engine and lay the engine in the hull over a piece of 1/8" thick plywood cut to fit between the rails. This will ensure your engine doesn't end up rubbing against the bottom of the boat. With the engine in place, shim the front of it to get the desired mounting angle and trace the contour of the rubber isolators on the stringers as best as you can. Remove the motor and find a 1" flat washer. Hold it against the rail inside the outlines of the isolators that you just did and now use the hole in the washer to mark the location you will have to drill. Works well and if done with care it will produce accurate results.
The engine was mounted at 30.5" from the back of the transom to the center of the spark plug.


The pictures below show the installation of the stuffing tube. To get proper alignment of the stuffing tube to the engine I used a piece of 1/4" rod installed in the motor's collet (in this case a 1/4" drill bit). The stuffing tube is mounted to the hull using fiberglass cloth and epoxy. Again remember to properly clean the bonding area with acetone and also rough up the brass tubing in order for the epoxy to properly grip to it. To prevent epoxy from seeping in through the cut-out in the hull you can simply use pieces of tape to seal off the cracks from the underside around the stuffing tube. If using a sleeve for the stuffing tube now would be a good time to put it on before bonding! In this case I didn't use one.
When laminating the stuffing tube in the hull, I always make sure it is mounted to the strut and curved the way I want it to be. The alignment with the motor is maintained by the 1/4" rod in the collet. After is has cured, you can measure and cut your flex shaft and install it.


The radio box was actually glued inside the hull since it is very accessible and will not be in the way for any maintenance to the boat. I used 5200 adhesive from 3M. I mounted the box up against the plywood crosser just behind the stuffing tube. The servo brackets were made with plywood sealed with epoxy. Normally I would have used the Aeromarine servo brackets, but the ones supplied in the kit were both for regular size servos and I like to use 1/4 servos for the rudder so I decided to make my own. The space is relatively limited in this radio box, so I assumed that is why Aeromarine supply the standard size servo brackets. One could easily use a standard size high torque servo for the rudder if preferred. I did however manage to fit my 1/4 scale metal gear servo in there!
To support the long 4-40 rudder control rod I used a tube cut from a carbon fiber arrow shaft. It was mounted using epoxy and wood blocks. The tube runs through the transom for added support.


The turn fin is a very important part of any hydro. In order for the boat to perform its best, the fin must be mounted correctly. The turn fin used was a Speedmaster sport hydro fin. The bottom of the bracket must be mounted parallel with the bottom of the hull. You can not rely on the bottom of the sponson as the bottom is on an angle. You can however rely on the bottom of BOTH sponsons buy doing as pictured and it works great! I used a piece of aluminum angle long enough to span from one sponson to the other (and perfectly straight). I set the rear edge of both sponsons on the angle and used it as a guide to mount the bracket. On some hulls the 1/2" might be too high for the bracket but on this one it worked out great. It mounted the bracket so the bend in the fin is in line with the outer edge of the sponson ride pad.
At the lake you will want to adjust the tilt of the fin for proper tracking by tilting it back or forward accordingly...you do this with the rudder set at neutral. When the proper angle is found, the boat will track straight.


The cowl for the Thunderbolt is delivered in one piece covering both the engine compartment and the real transom access opening. It should be cut into two pieces just behind the tuned pipe exit point. Looking at the hull, you can see the two openings. You want to cut the hatch at midpoint between the two deck openings. The rear portion of the cowl will not need to be removed often. I made a wooden tab for the back of this cover and used cowl locks for the front.
The main cowl (the one covering the engine and tuned pipe) is held in place with a wooden tab at the front which slides into a matching slot in the deck. The back of this cowl is secured with Orings that will allow it to break free in the event of a blow-over. Some air ducts were opened up in the cowl using a rotary tool and mini milling bit. This is to provide cooling air as well as combustion air for the engine.
The rubber isolator you can see between the two cowl locks is for supporting the tuned pipe. It absorbs the vibration from the pipe. Mounting this way only allows for approximately 1/2" in pipe length adjustment. If you require more you should make an adjustable support arm or use one of the commercially available pipe supports. When you know what length the pipe should be set at or if using a fixed length pipe, you can use this method. It worked out well for me on this boat.


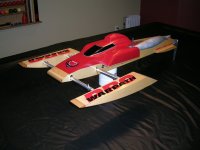
Here are some pictures of the finished boat...


Tail weight: 16 oz. *this is the weight measured with a scale under the strut with the boat resting on sponson ride pads. (not added weight)
Strut Depth: 1.25" from bottom of strut to bottom of hull
Strut Angle: 0 degrees
Strut Offset: none
Prop Used: modified 6518/3 from The Propworks
Engine: CC Racing Engines full mod Zenoah 260 PUM
Tuned Pipe: CC Racing Engines Powermaster Pipe

Final thoughts...
- good quality lay-up with reinforced seam
- good quality gelcoat finish
- sleek and aerodynamic design
- great performance
- good hardware package when ordered as hull and hardware combo
- good value - one of the lowest priced sport hydros on the market from a reputable manufacturer
- I think setup instructions should be supplied with the hull...at the time I received my hull I was advised that they were in the works, so new hulls might have them included.
- it is fairly difficult to get to the transom from inside the hull for the hardware installation...on the positive side, the hardware comes with T-nuts, so once you do manage to install them, you will never have to worry about getting in there again!
A very good sport hydro from Aeromarine Laminates!
Happy Boating!
Contact Information
Email: This email address is being protected from spambots. You need JavaScript enabled to view it.
") I'll order one this week from CC Racing. I noticed that they have them on sale, (hope it's the newer production,with instructions) but if not, I can check your review for information. Thanks Ron
I'll order one this week from CC Racing. I noticed that they have them on sale, (hope it's the newer production,with instructions) but if not, I can check your review for information. Thanks Ron ")