Product Review Article...
A review of the R-42 Cat from AC Model Boats...
Intro
Throughout the world, catamarans are one of the most popular style of boats in the Gas R/C Boat part of the hobby. It is a combination of speeds like hydros and handling like monos that usually draws most to them. They are the "best of both worlds" as you could say. In this review, we will build and test the AC Model Boats' "R42" Catamaran.
A Little history about AC Model Boats.
When you mention the name AC Model Boats in the R/C Boat world, the first thing that usually comes to mind is superb quality.
AC Model Boats is owned by Andy Stishenko, located in KELOWNA, B.C. CANADA. They have been in business designing, building and selling model boats since 1983. Andy has made it a priority to only produce the best quality boats he can, using the best resins and gelcoats available, even if it means being a bit more expensive than other boats on the market.
All AC Model Boats have the hull and deck joined in the mold with mat and resin "wet on wet" so there is no chance of a “weak” secondary bond. They all use only the best marine birch wood throughout, along with being reinforced with a stringer under the deck that ties into the bulkhead and engine stringers to make the boats practically bullet-proof. They are all stamped with a serial number, and come with a very descriptive Instruction book.
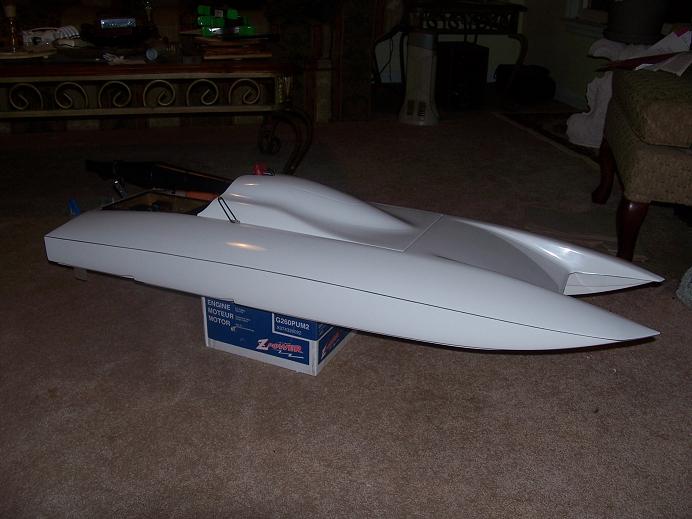
The R42 Cat is 42.5" long, 16" wide, and roughly 4.25" tall (not including Cowl).
The Build
**Note**: Before we get started, I will make it perfectly clear that I will deviate from the instructions a bit, and do some things I prefer to do when building this boat that are a bit different than how the instructions say to do. I have built and run many of the cats on the market over the years, and am just using tricks I've learned that many like for my driving style. This does not mean the setup for the boat from AC is not correct, and there is no reason you should not set it up per the instructions.
The first thing I noticed after pulling the boat out of the well packaged box and looking it over is that the layup quality of this boat is fantastic. It is very sturdy and quite light at the same time. Another thing I really liked is that the cowl is only 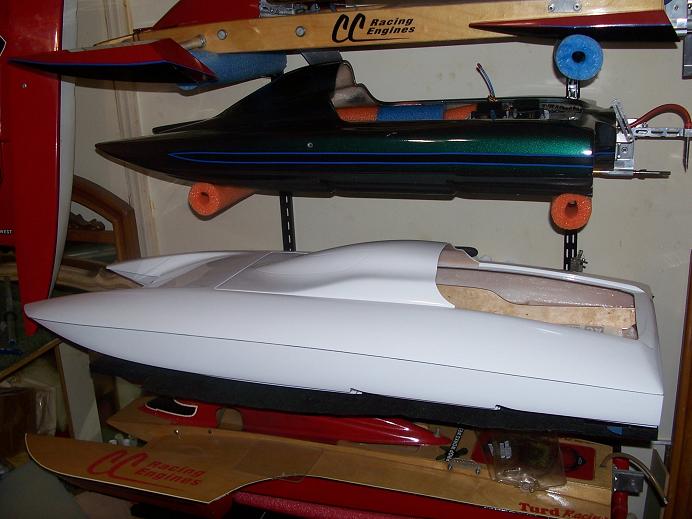 big enough that it covers the engine and carburetor to keep unwanted water out of it, and allowing plenty of airflow over and into the boat. Many of us cut cowls in half if they are full cowls so that we have the ability to run any pipe we want without having to worry about heat problems, and it's apparent that Andy took that into consideration when designing this boat.
The first thing you should start with is masking the transom off, so that you can accurately mark where the hardware needs to be mounted. You can mark on the gelcoat itself, but i like to not have pencil or marker lines on the hull, and if you make a mistake, it's easy to just remark on the tape. Remember, you want to measure twice, drill once.
With the transom now masked off, I will find and mark the centerline of the hull (which comes out to 8"). With this boat, .jpg) you want to offset the strut 3/16 to 1/4" to the right to compensate for propwalk. Measuring off the actual centerline of the hull, you want to mark a line 2.5" (to the right) for the rudder. Next find the center of "longitude" on the transom, and mark and draw a line. With the latitude & longitude lines drawn, it will help you keep everything mounted square and in the center of the transom. (I suggest using a flat building surface, along with a carpenter's square for marking everything to make sure its all striaght).
you want to offset the strut 3/16 to 1/4" to the right to compensate for propwalk. Measuring off the actual centerline of the hull, you want to mark a line 2.5" (to the right) for the rudder. Next find the center of "longitude" on the transom, and mark and draw a line. With the latitude & longitude lines drawn, it will help you keep everything mounted square and in the center of the transom. (I suggest using a flat building surface, along with a carpenter's square for marking everything to make sure its all striaght).
Now that everything is marked, I go ahead and start mounting the rudder (Speedmaster part # SPDR-011-SB). **Note, it is better to use the "T" style bracket instead of the "L" bracket, so you will have enough room for offsetting the strut brackets a full 1/4" over. To make it easy, I disassemble the rudder assembly so that just the small main bracket that bolts to the transom is by itself. You want the very edge of the bracket (on the right) inline with the line you marked on the transom (this insures that with the rudder bracket completely assembled, it puts the centerline of the blade inline with the right stringer, right on the 2.5" mark).
.jpg)
.jpg)
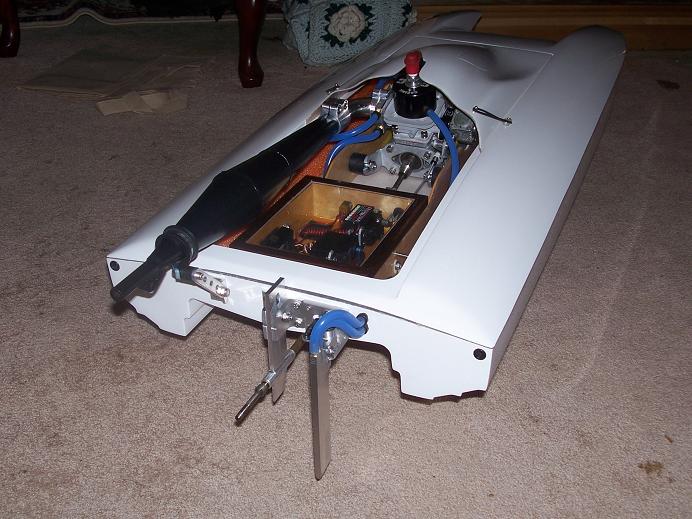
With the rudder bracket mounted, we can start mounting the strut brackets (Speedmaster skeg strut). I start by mounting the right side bracket as far over as i can get it, which ends up having the centerline of strut 3/16" offset. (picture 4) Now, you want to put the strut up against the bracket, and put the other bracket on and bolt the assembly together. This allows you to now mark your holes for the left bracket and make sure everything is square and the way you want it. With the brackets all mounted, I slide the strut as close to the transom as possible (leave about 1/16" gap) as I want to keep the prop fairly close to the transom. I mark the brackets, disassemble and cut and redrill to accomodate having the strut moved in and have a cleaner look.
.jpg)
.jpg)
.jpg)
.jpg)
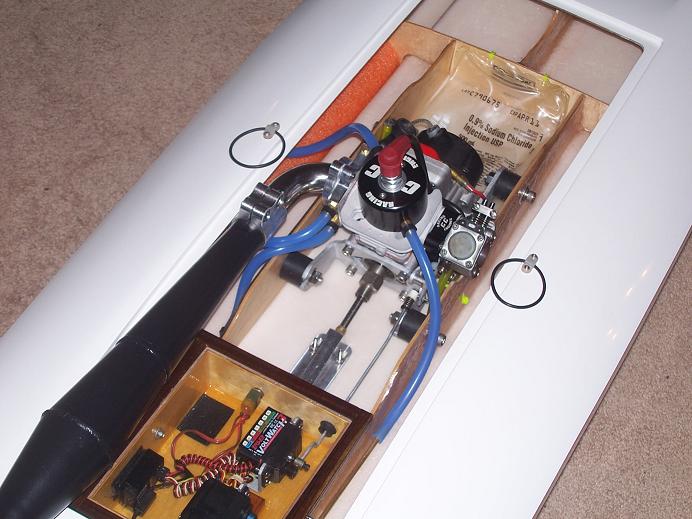
Now that most of the transom hardware is mounted, we can move inside and start setting up the radio box. For this, I .jpg) am using a wood box from CC Racing Engines. The quality of these boxes is outstanding. They are 4-7/8" wide, 6" long and 2" tall so they are a very snug fit
am using a wood box from CC Racing Engines. The quality of these boxes is outstanding. They are 4-7/8" wide, 6" long and 2" tall so they are a very snug fit .jpg) between the stringers and have plenty of room inside. I mount the box as far back as possible as to not leave any kind of noticeable gap between the edge of box and lip on deck so air cant get trapped within the hull behind it. With the box in position, I go ahead and set the throttle servo & servo bracket up where I want, and mark where the pushrod seal would be. Now I move onto doing the same for the rudder servo & bracket and finish it off with the rudder linkage, receiver switch (locking toggle switch from Speedmaster) and mounting the battery pack and receiver with Velcro.
between the stringers and have plenty of room inside. I mount the box as far back as possible as to not leave any kind of noticeable gap between the edge of box and lip on deck so air cant get trapped within the hull behind it. With the box in position, I go ahead and set the throttle servo & servo bracket up where I want, and mark where the pushrod seal would be. Now I move onto doing the same for the rudder servo & bracket and finish it off with the rudder linkage, receiver switch (locking toggle switch from Speedmaster) and mounting the battery pack and receiver with Velcro.
.jpg)
.jpg)
With the radio box pretty much done, I move onto setting the engine into the boat with pipe mounted on it so I can find the balance point. For this build I'm using a CC Racing Engines "BEAST" Zenoah with CC Racing drop mounts along .jpg) with a "BEAST" pipe also from CC Racing Engines. It is advised to balance these boats at 34 to 34.5%, but as the water can get very rough in racing, I decided I wanted it a little further foward after seeing a few R42's run, so I set the center of gravity at 34.75% with no fuel. I am not going to give a measurement for engine placement, as you should NEVER simply mount an engine by a measurement and expect the boat to balance at that point.
with a "BEAST" pipe also from CC Racing Engines. It is advised to balance these boats at 34 to 34.5%, but as the water can get very rough in racing, I decided I wanted it a little further foward after seeing a few R42's run, so I set the center of gravity at 34.75% with no fuel. I am not going to give a measurement for engine placement, as you should NEVER simply mount an engine by a measurement and expect the boat to balance at that point.
Having the engine now mounted, it was time to go ahead and start drilling for the stuffing tube. For this, I used a stuffing tube block from CC Racing. These make it very easy to make sure everything is lined up well since they come with an alignment tool. With everything drilled and mounted, I ran the stuffing tube. With having the strut offset, it is required that you make a slight "S" bend in the stuffing tube to get it aligned with the strut.
.jpg)
.jpg)
.jpg)
Moving along... it's time to lay out the fuel system. Depending on what engine mounts you use, and how low you mount the front of the engine, really determins what you can use for the fuel system and where you can put it. Since I had the room, I used a 500ml IV bag just in front of the engine. Mounting it in this position helps to keep weight more on the .jpg) center of gravity, and does not affect the attitude of the boat so much as the fuel level goes down. I drilled two small holes in the bulkhead to secure the fuel bag to. This keeps the bag at a bit of an angle, so if you happen to get a little bit of air in the bag, it stays up near there and away from the fuel pickup. I also epoxied a small peg into the hull that the bag sits over to keep it from moving. With the bag mounted, I could now run the lines. I drilled two small holes in the stringer to mount the fuel filter using a simple small Ziptie. You do not need to do this, but i prefer to have everything clean and secured in my boats. I also secured the second line, which is used just for filling the bag, to the stringer on the opposite side, away from the pipe using a simple nylon clamp.
center of gravity, and does not affect the attitude of the boat so much as the fuel level goes down. I drilled two small holes in the bulkhead to secure the fuel bag to. This keeps the bag at a bit of an angle, so if you happen to get a little bit of air in the bag, it stays up near there and away from the fuel pickup. I also epoxied a small peg into the hull that the bag sits over to keep it from moving. With the bag mounted, I could now run the lines. I drilled two small holes in the stringer to mount the fuel filter using a simple small Ziptie. You do not need to do this, but i prefer to have everything clean and secured in my boats. I also secured the second line, which is used just for filling the bag, to the stringer on the opposite side, away from the pipe using a simple nylon clamp.
.jpg)
.jpg)
Taking a step back to take a look, I can see that this boat is going together without a hitch. Now I can move onto the .jpg) cooling system. Something I like to do in my builds is take advantage of using brass tubing for this. It keeps the look clean, and if you ever have a problem with the silicone line and have to replace it, you only have to replace short pieces, instead of full lengths of it. Since I am using a dual pickup rudder blade, I start by cutting two small pieces of 5/32" tube to use as bulkhead fittings at the transom. After that, I
cooling system. Something I like to do in my builds is take advantage of using brass tubing for this. It keeps the look clean, and if you ever have a problem with the silicone line and have to replace it, you only have to replace short pieces, instead of full lengths of it. Since I am using a dual pickup rudder blade, I start by cutting two small pieces of 5/32" tube to use as bulkhead fittings at the transom. After that, I .jpg) secure a piece of the same tubing along the right stringer for the cooling feed going to the head on engine, secured with a nylon strap. Next I bend up a second line, that follows inside the transom and wraps out around and along the side of the left stringer for the cooling feed going to the exhaust flange. Two short pieces of silicone water line connect the tubes together to the bulkhead fittings. I take the opportunity to also drill the holes and mount the water outlets just below the deck on the hull, spaced roughly 2.5" apart so you can clearly see the water exiting both.
secure a piece of the same tubing along the right stringer for the cooling feed going to the head on engine, secured with a nylon strap. Next I bend up a second line, that follows inside the transom and wraps out around and along the side of the left stringer for the cooling feed going to the exhaust flange. Two short pieces of silicone water line connect the tubes together to the bulkhead fittings. I take the opportunity to also drill the holes and mount the water outlets just below the deck on the hull, spaced roughly 2.5" apart so you can clearly see the water exiting both.
.jpg)
With having the engine and pipe all setup in the boat, I can finally move back out to the transom and mount the tuned pipe bracket/clamp. This piece comes from Bill Valek (known by Billium on most of the forums). These are very nicely made brackets, and come polished along with all the required hardware. I also drilled a 5/16" hole in each corner of the transom just below the deck for water drains.
.jpg)
The last thing to do now was cut the cowl to clear the sparkplug/wire, and mount some cowl locks. For this I used the simple O-ring method with 4-40 ball studs. For the front of the cowl, it can be a little tricky to figure out how you want to mount the cowl. Many use magnets in each corner, some make aluminum tabs. I decided I wanted to keep it very simple, so I simply use a piece of tape across it holding to the deck for now, until I figure out exactly how I want to do it. Make sure you glue some flotation under the cowl in case it was to come off while running. I used about a 6" piece of pool noodle split in half, and glued to the cowl using a product called "Goop" that can be found at most hardware stores.
.jpg)
.jpg)
.jpg)
With all the basics done, I finalize the driveline by cutting the flexshaft to length, and make some modifications to the strut and rudder blade. Alot of times, I hear about guys having the welded flexcables break where the cable is welded to the stubshaft. I have never had this happen, and credit that to the way I set them up, which I will explain here. The first thing you want to do is slide the drivedog onto the shaft. With the drivedog on there, set your shaft bushing next to it, and make sure that the bushing is covering the welded area. If its not, just slide the drivedog back some more. Do not worry if when you put your prop on, you have some of the solid shaft showing before the threads. You can easily put an aluminum spacer (or waterline/fueltubing also works) between the hub on prop and the nut.
.jpg)
.jpg)
*Note: a good trick for keeping the drivedog secured...pull the screw or screws out of the drivedog, but keep it on the shaft where it needs to be. Take a marker and mark on the shaft in the hole for the set screw on drive dog. Now take the drivedog off, and grind a small flat spot on the shaft. This insures the set screw gets a good bite on the shaft. Put the drivedog back on, drop some red loctite into the hole, and put the set screw in and tighten.
Now we can move onto getting the shaft the proper length for the boat. We take the shaft and put it in the boat like normal, and make sure it goes all the way into the collet. .jpg) With that done, measure the distance between the end of your strut bushing and the drivedog. Here you can see we have 3" sticking out. What you want to do now is take that measurement, subtract the distance you need to leave between the bushing and drivedog, in this case 1/4", and you have the amount you need to cut off the other end of the shaft (approximately 2-3/4" in this case). When you cut the shaft (Dremel with a carbide cutting wheel or equivelent), make sure you bevel the end on a grinder or belt sander. This lets it slide into the collet easier. Some prefer to coat the end of the shaft in silver soldier. I don't, and have never had a problem not doing so. With the shaft cut and slid back into the strut and into the collet, you can now see we have the 1/4" gap, just how you want it!
With that done, measure the distance between the end of your strut bushing and the drivedog. Here you can see we have 3" sticking out. What you want to do now is take that measurement, subtract the distance you need to leave between the bushing and drivedog, in this case 1/4", and you have the amount you need to cut off the other end of the shaft (approximately 2-3/4" in this case). When you cut the shaft (Dremel with a carbide cutting wheel or equivelent), make sure you bevel the end on a grinder or belt sander. This lets it slide into the collet easier. Some prefer to coat the end of the shaft in silver soldier. I don't, and have never had a problem not doing so. With the shaft cut and slid back into the strut and into the collet, you can now see we have the 1/4" gap, just how you want it!
.jpg)
Next I move to the rudder blade. Now, you can leave these alone if you prefer, and normally for a race cat I will leave the .jpg) blade the stock length. But to ensure I get the most out of the blade, especially from the cooling, I make a couple simple modifications. First, I cut 1/2" off the total length of the blade, then move onto modifying the water pickups. On a stock rudder blade, the pickups are usually a little narrow, and dont extend all the way to the leading edge of the blade. Using a 1/8" carbide cutter in a Dremel, I slowly work the pickups making them slightly wider, longer and deeper. At the same time, I extend them out to the leading edge of the blade, and cut slight "half moon's" on the leading edge. This modification helps to ensure the pickups are getting water with the blade turned either direction.
blade the stock length. But to ensure I get the most out of the blade, especially from the cooling, I make a couple simple modifications. First, I cut 1/2" off the total length of the blade, then move onto modifying the water pickups. On a stock rudder blade, the pickups are usually a little narrow, and dont extend all the way to the leading edge of the blade. Using a 1/8" carbide cutter in a Dremel, I slowly work the pickups making them slightly wider, longer and deeper. At the same time, I extend them out to the leading edge of the blade, and cut slight "half moon's" on the leading edge. This modification helps to ensure the pickups are getting water with the blade turned either direction.
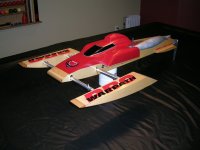
With the boat now completely assembled, you can take a step back and check out your boat, making sure you didnt leave anything out.
Now it's time to tear it all back down, and treat it to some paint or just simple graphics. For this boat, I decided to do a paint job, so I scuffed up the gelcoat, and laid down the color (Duplicolor MetalSpecks "Retro Red") along with SprayMax 2K Urethane Clear coat. After sitting for a couple days, and buffing and polishing the clear along with adding simple vinyl decals and pinstripes, it's now time to put it all back together, make sure all the linkages are setup with the radio settings all dialed-in, put some flotation in it and head to the lake!
.jpg)
.jpg)
.jpg)
At The Lake
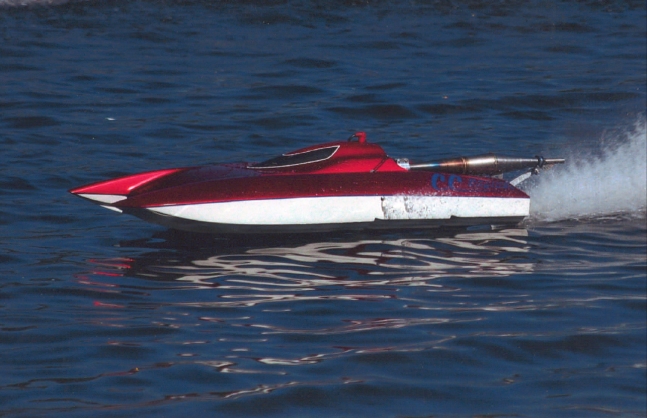
From the minute this boat hit the water it showed nothing but great things. I initially set the strut at 1/4" above the bottom of the sponsons with no angle, and that appeared to be where the boat liked it to be, running a self modded PropShop 6717/3. Coupled with the power of the CC Racing Zenoah, it had the ability to mill down to a crawl, pop up and run dry but quite level on the water. Going into the turns, the boat had no bad habbits to speak of other than some slight porposing, but that went away as the boat ran in a bit rougher water. Judging by how the boat runs by itself, there's no doubt it has the capability of running out front and winning when the water gets chopped up. Here are some pictures of the boat in the water.
.jpg)
.jpg)
.jpg)
And Some video...

Final Thoughts
For anyone looking to get into running a gas Catamaran, I would definitely put this boat up at the top of the list. There is nothing about the boat, the way its built, or the way it runs that I do not like. They are a very easy and straight foward boat to build, and will for sure put a smile on your face anytime you run it!
Special thanks to:
Al Gorman - for supplying the Boat and Parts
Carlo Catalanotto - for the Engine, Pipe, and Most of the parts for the build
Randy Corbin, Kurt Stutz & Ricky Lehman for Setup tips & Information
Contact Information:

 & i will be a lot more happier than happy Gilmore when i get it
  .
.